iPhoto is an excellent Mac OS X application created by Apple which is used by countless amateurs (like yours truly) to manage their digital photo collection. Since the release of iPhoto ’08, a lot of people have wondered how to do an incremental backup of their library as this latest version of iPhoto keeps the library in a package (a special type of folder) instead of a plain folder and some backup applications have trouble with that. (An update: I tried doing the same thing with the latest HFS+-aware version of rsync 3.0 but I couldn’t do it as it seems to me that rsync does not copy all the metadata created by Mac OS X. Maybe I missed an option…)
I’ve managed to do incremental backups (i.e. quick and painless) using my registered version of SuperDuper! It’s important to use a registered version of SuperDuper! in order to do smart updates which is what SuperDuper! calls incremental backups. The non-registered version of SuperDuper! cannot do incremental backups which means that the whole iPhoto library will be copied over when doing a backup (which means 15Gb in my case…)
This great backup software is normally used to backup a whole partition (i.e. my MacBook’s hard disk) to another partition (i.e. a partition on an external drive which can then be used to boot the MacBook.) I’ve just realized that it’s relatively straightforward to restrict the files to be backed up to a selection (i.e. your iPhoto library only…) and, instead of the destination being a partition, to choose a sparse image (i.e. a special file containing other files and which takes up only as much actual disk space as the data contained within.)
Step 1

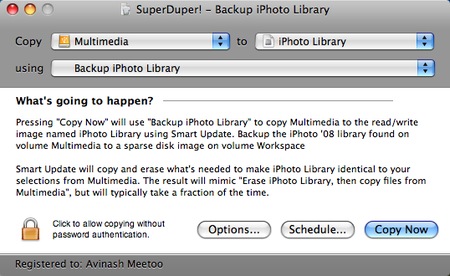
First of all, select the partition where the iPhoto ’08 library resides in ‘Copy’ (mine is Multimedia.) Then select where the sparse image will reside (I chose a folder on another disk.) Then you’ll have to create what SuperDuper! calls a copy script which will be used to indicate what to copy and what to ignore. To do that click on the drop down next to ‘using’ and choose ‘New Copy Script.’
Step 2

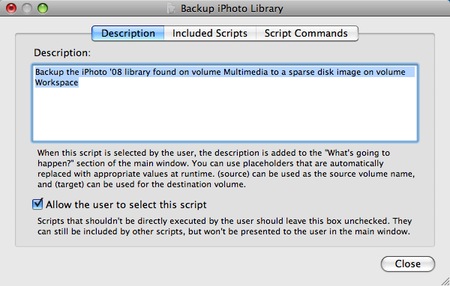
Write a nice description and make sure that the ‘Allow the user to select this script’ is ticked.
Step 3

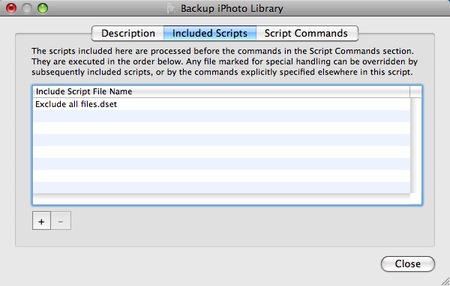
In the ‘Included Scripts’ tab, click on the ‘+’ and choose the predefined ‘Exclude all files’ script. This is to make sure that SuperDuper! only backups those files and folders that you’ll explicitly specify and ignore all the rest. This is essential.
Step 4

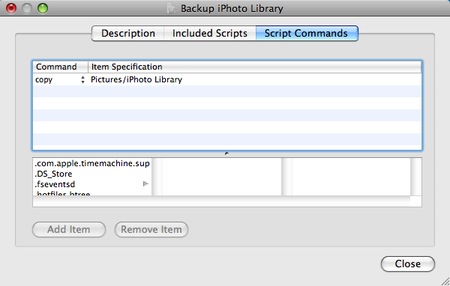
Then, in the ‘Script Commands’ tab, navigate to the folder where the iPhoto library is found and select it. Click on ‘Add Item’ and it will be added in the top part of the window. The default command is ‘ignore.’ Change that to ‘copy.’ As you can easily guess, this, combined with the ‘Exclude all files’ seen previously, will tell SuperDuper! to only consider the iPhoto library and nothing else which is what we want.
Click on ‘Close.’ and give a sensible name to the script (‘Backup iPhoto library’ is nice…)
Then you can click on ‘Copy Now’ and, voilà , an incremental backup is done! Remember to use a registered version of SuperDuper!

You seem to take backup seriously. I do too. In fact, I am working on a post about backups/cloning. I am currently at the testing stage. After having tested both Carbon Copy Cloner, and SuperDuper!, I decided to register SuperDuper! as it seems to be less CPU-intensive between the two.
While iPhoto is a good photo management application, it does have its limits though, especially when it comes to editting the photos (compared to say Photoshop Elements). With Photoshop Elements, I can use the Levels dialog to choose the highlights, shadows, and midtones. Choosing the right midtones will, very often, be enough to correct a colour cast.
Have you noticed that importing photos in iPhoto is quite CPU-intensive?
Hi Patrick,
I believe you’ll be happy with SuperDuper! It works great ;-)
As for iPhoto, the latest version ’08 has a pretty good editor (with excellent straightening, cropping and red eye removal facilities.) It also can color-correct and change the shadows/highlights of a photo. Its sharpening is also good enough. All in all, I practically never use another image editor for my digital photos.
But, sure, it’s less powerful than Photoshop :-)
I’m starting to like it more, the more I use it.
When I bought my first digital camera, I did not have a Mac, and therefore started to use Photoshop Elements (cheaper) and liked it. It was my first love :-)
Avinash,
Great post. I just added a Nikon D200 to my collection of cameras (I hit the D40 limits pretty quickly) and have started shooting in RAW. With pictures 10MB apiece, I will need all the space I need.
Will SuperDuper keep archived images on the backup medium even if I remove some from my main iPhoto Library? Or, will it forcibly sync the two so that an image removed from the main library also be removed from the backup, which would not be desirable?
Eddy.
Hi Eddy,
SuperDuper! propagates changes i.e. all images removed from the source will also be removed from the destination. The reason is that SuperDuper! produces an exact clone of your iPhoto library which seamlessly can be opened by iPhoto.
If you only want to copy all your RAWs or JPEGs and never ever delete something from the destination, I would advise you to use rsync without the –delete option. Mind you, this won’t create an iPhoto-compliant library.
To Eddy:
I think almost all serious amateur photographers, eventually start to shoot RAW, once they’ve move into the DSLR world.
To Avinash:
Doesn’t SuperDuper! has an option to not delete what is already on the external drive? Personally, I just make sure I maintain my MacBook internal drive the way I want it, and let SuperDuper! clone it. The main drawback is, unlike Time Machine, I cannot restore deleted files. The ideal solution would be to have a few external HDD, and to clone to one at a time, or a least two external drive, each at least twice the capacity of the internal drive, and rotate four partitions.
I HAVE managed to come up with a workflow that will allow me to a) retain my current backup strategy and b) save enough space for current RAW images being processed. Here is how it works.
1. Use iPhoto Library Manager to split current photo library into two: one for current images and another for archived images.
2. Back up both images libraries to external disk and remove archive one from internal disk.
3. As current images library grows, use iPhoto Library Manager to move them across to archive library on external HDD.
4. Back up archive image libraries to DVD in the same current staggered manner.
What I like about this is, it allows me just pop archive DVDs and still use iPhoto to navigate through and view the pictures. The downside is, I have about 10 DVDs worth of images arranged by rolls (and labelled accordingly) while the current iPhoto ordering favours events. So, from ROLL 1-10, I now have to switch to EVENTS 2008-08, 2008-09, etc. Having said that, events are just rolls with a different name :-)
RAW is great. I was a click away from ordering Lightroom 2.0 (at $299) when I came across UFRAW. UFRAW reads RAW/NEF files and integrate well with GIMP. Both UFRAW and GIMP have support for colour profiles, which makes them suitable for photo processing.
@Avinash: I have thousands of images post-processed with iPhoto. I have also discarded other thousands because iPhoto could not recover them from bad shooting, etc. Yesterday, I was about to throw some away, then I gave GIMP a try — it integrates well with iPhoto with the correct preferences — and managed to recover them (they were not RAW, just simple JPG). I guess what I am trying to say is, try to use GIMP instead of iPhoto for your post-processing. You will be amazed.
One of the pictures I was about to throw away:
http://flickr.com/photos/jeyoung/2879809695/
Eddy.
HAVING written ALL that, I realise that I could share my external disk through my Airport Extreme Base station and set that up as my main iPhoto Library medium. It should be comfortable to work with for casual photo browsing while maintaining a second library on the internal disk for post-processing current images.
Eddy.
Hi Eddy,
Nice to know you are having a lot of fun writing comments here :-)
@Avinash – Yeah, I could have written a blog post, but that would only scatter the information in multiple places. It is easier for a search-er to pick up the info from one place.
Eddy.
To Eddy:
I’ve tested Lightroom 2.0 a little bit, and I must say I was impressed. Too bad I don’t have a DSLR to shoot RAW. On the other hand, a DSLR would have taken me away from my main goal. You are the proof that photography can take up a lot of ones time ;-)
UFRAW and GIMP seems to be a good (cheap) alternative to LightRoom 2.0/Photoshop.
hi Avinash, great instructions. However, i store videos on Iphoto, on a library called iphoto_video – it is kept on an external hard drive. Can you use super duper to back up from one ext hd to another?
thanks
bishan
Of course.
Just select the correct Volume name in SuperDuper! and everything should be ok.